When night falls, the creepy, crawly, and slimy creatures come out to feast in the garden. Every morning we have found that another seedling had been tortured or devoured. Last night, my husband, embarked on a seek and destroy mission. Upon his return, he proudly announced his success as I reminded him to wash his hands.
His total kill: 6 large slugs, 6 snails, 2 cutworms.
There is no photographic evidence to share of this gruesome scene.
On a lighter note, he also witnessed the moonlight mating dance of earthworms.
Thursday, April 19, 2012

Egg Carton Seed Tray- FAIL

So, lesson learned is to start my tomato seeds in latte cups (like I did the past four years), so their root and shoot growth can be undisturbed for at least a couple months.
Wednesday, April 18, 2012
DIY- Grow Light
I love having friends who are just as crazy about gardening as we are. I visited a friend last week who had rigged up a grow light this year in order to be more successful with her vegetable starts. Let's just say, I was super jealous of her 8 inch tall lush tomato starts. (Once again, I'm kicking myself for not starting our seeds sooner.)
She gleaned ideas for her set up by searching the internet for DIY grow lights. She found that she could use a cheap Christmas rope light for a heat mat and a fluorescent shop light with a cool bulb and a warm bulb for a grow light. She turns the light on when she wakes up and turns it off when she goes to bed.
Since I was super motivated after visiting my friend, I went to Home Depot and purchased a 4' hanging fluorescent shop light and a packet of "daylight" bulbs and a packet of "soft light" bulbs. I hope I got the right ones. In total I spent less than $40 and I have two spare bulbs in case I want to get a second light fixture.
I used some wood and screws we had laying around to build a framework that would fit on our breakfast nook table. The only other parts I used were two eye hooks and two "S" hooks to hang the light from the framework.


She gleaned ideas for her set up by searching the internet for DIY grow lights. She found that she could use a cheap Christmas rope light for a heat mat and a fluorescent shop light with a cool bulb and a warm bulb for a grow light. She turns the light on when she wakes up and turns it off when she goes to bed.
Since I was super motivated after visiting my friend, I went to Home Depot and purchased a 4' hanging fluorescent shop light and a packet of "daylight" bulbs and a packet of "soft light" bulbs. I hope I got the right ones. In total I spent less than $40 and I have two spare bulbs in case I want to get a second light fixture.
I used some wood and screws we had laying around to build a framework that would fit on our breakfast nook table. The only other parts I used were two eye hooks and two "S" hooks to hang the light from the framework.


There's enough space for one tub of starts. If this works out well, I'll adjust the framework to fit two lights and two tubs. I'm excited to see how much faster these starts grow compared to the ones only getting light from the window and the ones in the cold frame outside.
Tuesday, April 17, 2012
Cold Frame
I really really really want a greenhouse. A little garden retreat that will heat up on those sunny winter and early spring days. A place where I can work with my seedlings even when it's raining.
Over the winter we debated where we could build one in the garden and whether to design a combination greenhouse/chicken coop. The debate continues, so in order to move some of our starts out of the dining room, we built a little cold frame out of salvaged materials we had taking up space in the basement.
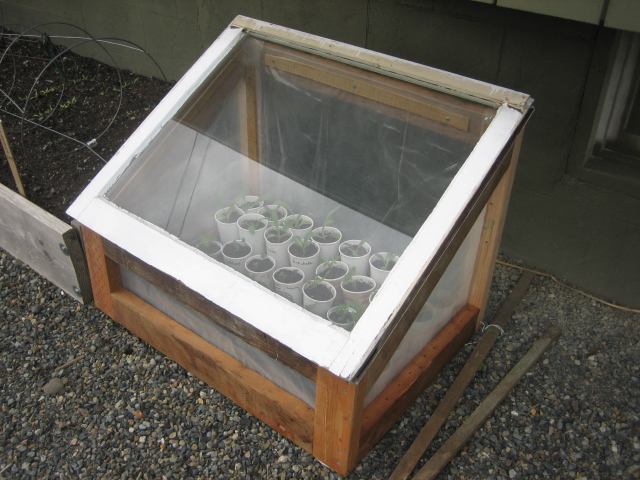
We placed a number of our starts in the cold frame. We moved out what we thought were the most cold tolerant starts- cilantro, parsley, artichokes, and zinnias. We also moved out a couple tomatoes starts as a test. If this cold frame design works out okay over the next couple of weeks, we'll build one or two more.

Thursday, April 12, 2012
Starts 2012
I vowed that I wouldn't use my window seat for starts this year. Well this is how it turned out...

We planted our starts on March 17.

Artichoke- Green Globe

Tomatoes are putting on their first true leaves

Cilantro is almost ready to start eating
Fresh Pickings

Lettuce we planted in January (under plastic)
+
Broccoli planted last Fall
+
Dill (self seeded)
=
Salad in April
Wednesday, April 11, 2012
Potato Towers
Growing potatoes is really easy and fun. Freshly picked potatoes taste fantastic and have the most amazing texture. (This is coming from a gal who hated potatoes growing up.) There are many different methods for
growing potatoes from straight into the ground, to using tires, cages, bags,
garbage cans, and boxes. In the
past we’ve tried large pots and in the ground using the hilling up method. The in ground method worked very well, but makes for difficult harvesting of young potatoes. This year we are going to try using
potato towers for our early and mid season potatoes. Our late season potatoes are being planted in a raised bed
using the hilling up method.

We built 2 ft x 2 ft boxes using four 2x4's for the vertical legs
and six inch wide cedar fence boards for the sides. We attached one layer of cedar fence boards at the
base. One side got a second layer to add a little more stability.


We set the boxes in a raised bed with the bottom layer partially buried. We then planted 6 potatoes in each box (2 per side). We planted early & mid-season potatoes- a mix of Reds, Banana Fingerlings, and Yukon Gem. In trenches behind towers we planted late season varieties- Russets and German Butterball, as well as, the extra Reds and Yukons. We covered the potatoes with a few inches of soil and then layered some pine needles on top to help acidify the soil.


When the potatoes grow out of the soil an inch or so we’ll
add some more soil and continue this until the soil fills that first layer of
boards. When we screw on the next
layer of boards we will drill two ½ inch holes in each side where the two
boards meet and try to train one shaw from each potato to grow through it. This will allow the potato to photosynthesize
(create energy) while the rest of the shoots continue to grow upwards and get
covered with soil. Once the entire
box (four board layers tall) is filled with soil, we’ll let the plant grow
freely to make a full leafy top.
We googled “potato towers” and found a variety of
styles. We also searched YouTube
for videos on “potato towers” and “potato boxes” and found a number of
unsuccessful harvests and a couple of videos from successful growers. The two biggest mistakes we saw from
unsuccessful towers were letting the potato shoots get too tall before adding
more soil and keeping the soil too wet.
Letting the shoots get too tall allows the shoot to convert to a “shaw”
or leafy growth. When this happens it no longer produces potatoes along that
shoot. It is important to add more
soil when the shoots emerge out of the soil. Cover the shoots with an inch or two of soil. The plant does need to photosynthesize at some point, so we may let some shoots get a little taller and develop leaves while covering up some shorter ones. I highly suggest the following links for more information.
Henley Potato Tower- Science behind growing Potatoes
Harvesting Henley Potato Tower Video
How to Make a Garbage Can Potato Tower Video
Harvesting a Garbage Can Potato Tower Video
Harvesting Henley Potato Tower Video
How to Make a Garbage Can Potato Tower Video
Harvesting a Garbage Can Potato Tower Video


We set the boxes in a raised bed with the bottom layer partially buried. We then planted 6 potatoes in each box (2 per side). We planted early & mid-season potatoes- a mix of Reds, Banana Fingerlings, and Yukon Gem. In trenches behind towers we planted late season varieties- Russets and German Butterball, as well as, the extra Reds and Yukons. We covered the potatoes with a few inches of soil and then layered some pine needles on top to help acidify the soil.


Harvesting:
When the potato plant starts to flower, we will be able to
remove a lower board and reach in to grab young potatoes to eat fresh. Later in the season when the top growth
dies back, we’ll be able to remove all the boards and easily collect the
remaining potatoes.


Terry is practicing how he'll reach in and grab those young spring potatoes.
Storing Potatoes:
Last year we grew potatoes in one of a raised garden beds using the hilling up method. We ended up just leaving them in the ground and harvested as needed. This worked out very well except when I had to go out on an rainy icky day and root around in the dirt for dinner. What was neat is that this Spring we found some little potatoes left in the bed and we got to eat our homegrown potatoes even though we thought we finished them off months ago.
Basic Growing Tips:
- Buy Seed Potatoes from a nursery (they should be disease free)
- Feed with a 1-2-2 ratio Organic Fertilizer
- Use well-drained soil, you can mix in composted leaves, pine needles, straw
- Use acidic soil (this will prevent scab); add pine needles or coffee grounds
- Keep the pile of soil near the potato box to make for easy filling
- Do not overwater or the potatoes can rot
Subscribe to:
Posts (Atom)


